Replacing a FUHR Roller Automatic Multipoint Lock with a HOPPE
Replacing a FUHR Roller Automatic Multipoint Lock with a HOPPE
Replacing a FUHR 3-Roller Automatic Multipoint Lock With a HOPPE Multipoint Lock
FUHR no longer ships its products to the United States, and direct replacements for FUHR products are not readily available. All About Doors & Windows can help you find a replacement for your FUHR multipoint lock.
This article pertains specifically to replacing a FUHR 3-roller automatic multipoint lock (part #499010299 at All About Doors & Windows). This lock features a European style cylinder and has two roller-style bolts that automatically engage when the door is shut, and one roller that triggers the locking action (auto-release roller).
Note #1: This article can also be used to replace FUHR 2-roller manual multipoint lock (part #499010199). All steps are the same, but it must be replaced with a HOPPE manual—there will be no auto-release roller, so simply skip those steps.
Note #2: Take appropriate safety measures and precautions when removing, changing, cutting and replacing locks. Safety eyewear and gloves are highly recommended, especially when cutting.
There are two options when replacing this FUHR lock:
1) Part #4990200:HOPPE Manual 2-Roller: rollers engage when handle is lifted
2) Part #4990201:HOPPE Automatic 3-Roller(2 locking rollers, 1 auto-release roller): When handle is cocked and door closed, locks engage
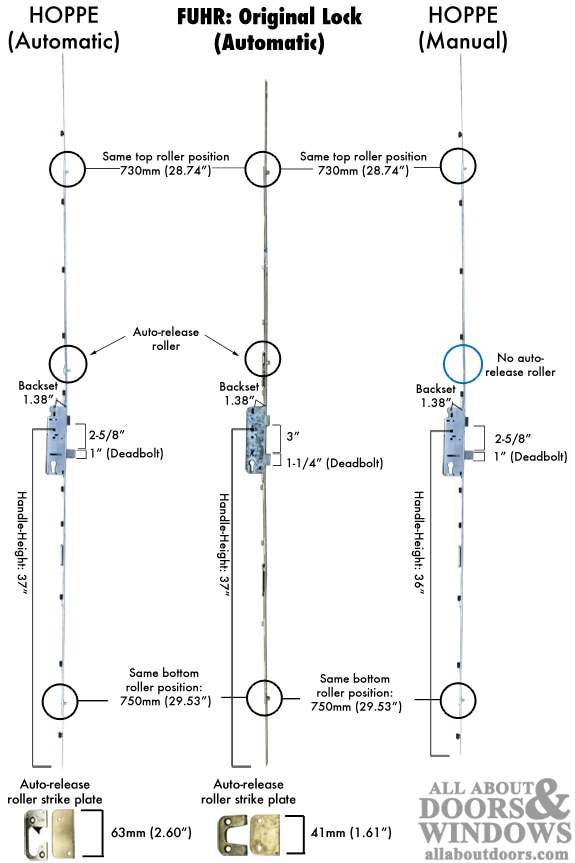
The processes for installing the manual and automatic locks are very similar. The differences in the process are included in the instructions below. Choose the lock that operates according to your preference. The differences between the HOPPE replacement options and original FUHR lock are shown in a diagram at the end of this tutorial.
Summary of Replacement Process (Detailed Steps Follow)
- Remove existing lock
- Trim top extension of new lock if necessary
- Attach lower extension
- Install lock
- Modify or Replace deadbolt strike plate
- Install new auto-roller strike plate if installing HOPPE automatic lock
Detailed Steps:
First Things First: Remove the Old Lock
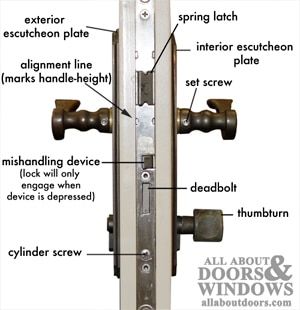
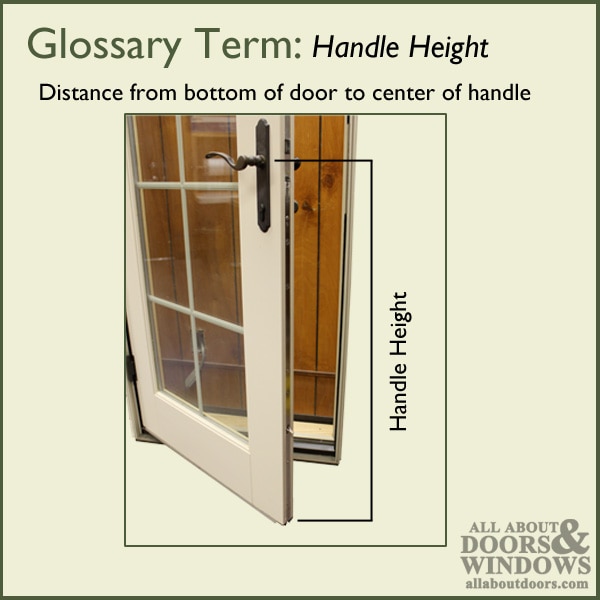
- Use a pencil to mark handle height and alignment line on edge of door panel before removing lock. New lock has to be at same handle height for rollers to line up with jamb side strikes.
- Loosen set screws on base of handles, and remove handles.
- Remove interior / exterior escutcheon plates.
- Unscrew cylinder screw on door edge (where latch is located), and remove cylinder.
- Lock runs entire length of vertical edge of door. Remove all screws.
- Remove the multipoint lock from the door edge.
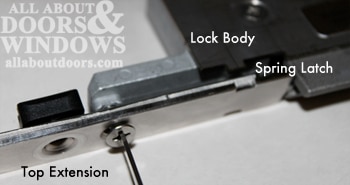
- Line up new lock with old lock and note dimension differences and similarities:
- Lock body should be similar length and width
- Deadbolts are different widths and in different locations
- Overall length from top to bottom may vary
- Faceplate length from bottom to handle will be one-inch off if replacing FUHR automatic with HOPPE manual lock.
- Position of top and bottom rollers should be the same
- On HOPPE Automatic, auto-release roller will look different and move vertically
- On HOPPE manual, there is no auto-release roller, just two rollers
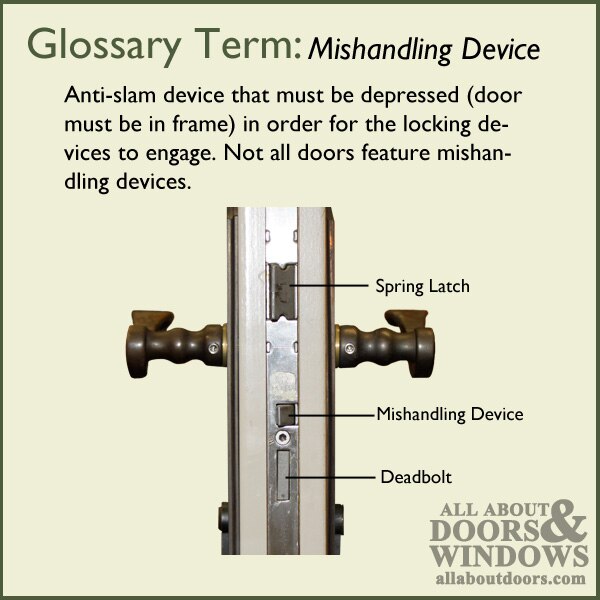
- HOPPE locks come with a mishandling device, which keeps the locks from engaging unless door is closed (mishandling device is depressed), preventing the locks from banging up the door jamb.
Trim That Lock (If You Need To)
The new lock will fit in your door. You might have to make some modifications first, though.
- If lock is too tall at top: Go back to your measurements. Before you cut the extension, use a piece of tape to mark the back of your new lock top extension so it doesn't overreach the top of the door. Trim the top end of the top extension to length with a hacksaw.
- If lock is too short at bottom: The manual version will work, leaving a small 1-inch gap. Having extra space at the bottom and top of your door will not affect the operation of the lock. The extra cutoff metal from the top extension can be recut and trimmed to fit the 1-inch gap at bottom of door panel.
Note #1: Lock can be installed without the top extension to verify everything works before trimming top extension piece to size.
Note #2: It is recommended that you use a hacksaw when cutting the top extension to length. A circular saw will generate heat and cause the metal to change color.
Note #3: If using the HOPPE manual with 36 inch handle height to replace old FUHR lock, there will be an inch of space in the bottom of the door panel, due to the difference in handle-height. Install the HOPPE manual lock at same handle-height as the FUHR (37" handle-height).
Installation
- If still separate from the lock body, attach the new upper extension piece to the new lock body. Loosen screw in top of lock and attach extension.
- Place lock body in mortise (big hole in the door). Align handle height to mark made at alignment spot of old FUHR lock. Install one or two screws to check operation before installing the rest of the screws.
- Insert a handle and spindle into the lock to check lock operation:
- Manual HOPPE: Door locks when handle is lifted
- Automatic HOPPE: Door locks automatically when closed – handle has been cocked, by pushing handle down, and when door is closed, it triggers roller above handle to lock rollers
- Note: Check the lock while door is open so lock is visible and accessible if not operating correctly; to check lock while open, mishandling device must be depressed with fingers or lock will not work**
- If door functions properly, tighten and install all screws running up and down length of faceplate.
- Re-install interior and exterior escutcheon plates, cylinder and handles.
Making the Deadbolt Strike Plate Work
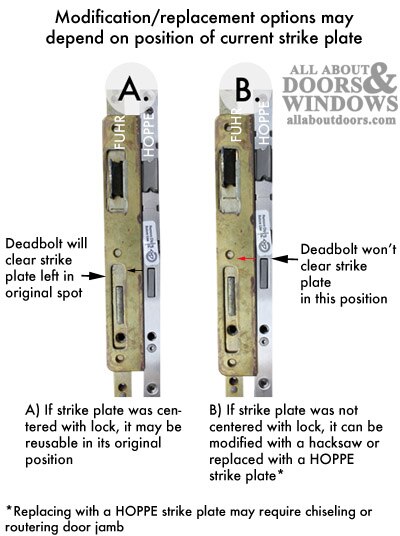
Because deadbolt is in a different spot on new HOPPE lock, strike plate needs modification or replacement.
All About Doors & Windows has assorted finishes of HOPPE strike plates available on our website at http://www.allaboutdoors.com.
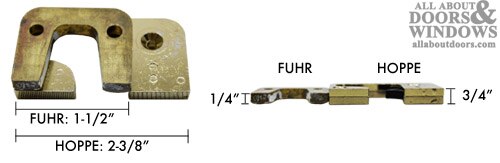
Strike plate can be reused. Reusing may require enlarging deadbolt hole using hacksaw, Rotozip, file or other.
If replacing strike plate, door jamb may require mortising to make the strike plate fit level in the jamb. If mortising of jamb is required, there will also be some exposed cut-out where FUHR strikeplate was located.

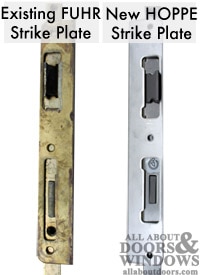
Note: Existing roller strikes at top and bottom of door jamb (pictured at right) can be reused. Replacements are available, but they don't change the function or operation of lock and do not require additional modification of door jamb.
Installing Strike Plate After Modification or Replacement
- Throw deadbolt while door is closed to see where deadbolt hits door jamb.
- Loosely screw strike plate in place. Close door and throw bolt again.
- Make any adjustments needed to correctly align strike plate. Use pencil to mark on jamb where strike needs to go and where deadbolt hole is located.
- Remove strike plate. Jamb will need cutting into to ensure proper engagement of deadbolt. A hole will need to be bored for deadbolt. Trim may also need to be chiseled to make sure strike plate sits level in jamb.
- Use Rotozip to cut deadbolt hole. **Note: hole can be cut slightly bigger than markings as long as strike plate covers it.
- Depending on strike plate, chisel some additional wood in jamb if needed to allow strike plate to sit level in jamb.
Auto-Release Roller Strike Plate
If installing the manual HOPPE, existing auto-release strike plate can remain in place; it won't be used. Alternatively, it can be removed and the hole filled.
If replacing old FUHR with automatic HOPPE:
- Remove existing FUHR auto-release strike plate.
- Hold new HOPPE auto-release strike plate up to door jamb and close door to see approximately where lock hits strike plate. Strike plate should be installed so engaged rollers (in down/locked position) fall into lower cavity of strike plate. /li>
- Mark location of new strike plate including roller cavity on door jamb.
- Use Rotozip, router or chisel to lengthen existing cavity approximately 7/8 inch.
- Install new strike plate, screwing underplate in first, then strike plate with cavity.
Operating New Lock
Operating HOPPE Manual:
- Close door and lift handle to lock rollers in place.
- Twist thumbturn to engage deadbolt lock.
- Unlock from inside by twisting the thumbturn and pushing down on handles; unlock from outside using key and pushing down on handle.
Operating HOPPE Automatic:
- Cock handle up and close door. Rollers will automatically engage and door will be locked.
- Twist thumbturn to engage deadbolt lock.
- Unlock from inside by twisting thumbturn to release deadbolt and then pushing down on handle; unlock from outside using key and pushing down on handle.
Parts Used:
4990200: HOPPE HLS9000 Two Roller Manual Multipoint Lock with 37" handle-height and top roller position of 730mm
4990201: HOPPE HLS9000 Two Roller Automatic Multipoint Lock with 36" handle-height and top roller position of 730mm
8784775: Underplate for auto-release roller strike plate (in brass, nickel and oil-rubbed brass)
8785003: Regular roller strike plates (in brass, nickel and oil-rubbed brass)
8783867: Auto-release roller strike plate (in brass, nickel and oil-rubbed brass)