Replacing an Essve-Truth Multipoint Lock: Hook Version
Replacing an Essve-Truth Multipoint Lock: Hook Version
Replacing an Essve-Truth Multipoint Lock: Hook Version
Essve has stopped manufacturing multipoint lock with Truth Hardware. The Essve - Truth locks were used on Marvin, Pease and Atrium doors. They featured hook locking mechanisms and did not run the entire length of the door but was adjustable to handle-height and could be installed wherever the user desired.
Although Essve is no longer in the multipoint lock business, broken or worn-out Essve - Truth locks can be replaced with our Custom-Manufactured multipoint locks (Custom-MPL). Our Custom-MPL features hooks that are similarly sized, shaped and positioned as the Essve.
This article is intended specifically for replacing a 68" Essve lock with hooks (parts # 499051599 and #499051799) with a custom replacement lock (part #4990615-KIT).
Summary of Steps (Detailed Steps Follow)
- Remove existing lock.
- Fit new lock into mortise in door.
- Modify hook box mortises to fit new lock.
- Modify faceplate groove to accommodate square-ended faceplate of Custom-MPL lock.
- Check operation of door while open.
- Secure lock in door panel.
- Re-install handles.
- Move or modify existing strike plates to accommodate new lock.
Detailed Steps
- Loosen set screws on base of handles, and remove handles.
- Remove interior / exterior escutcheon plates.
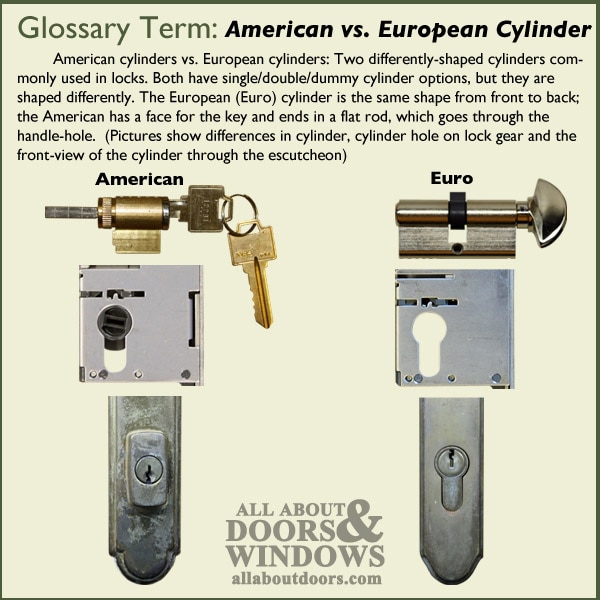
- If have a Euro profile cylinder, unscrew cylinder screw on door edge (where latch is located), and remove cylinder (this step is unnecessary if have an American-style cylinder).
- Lock runs entire length of vertical edge of door. Remove all screws.
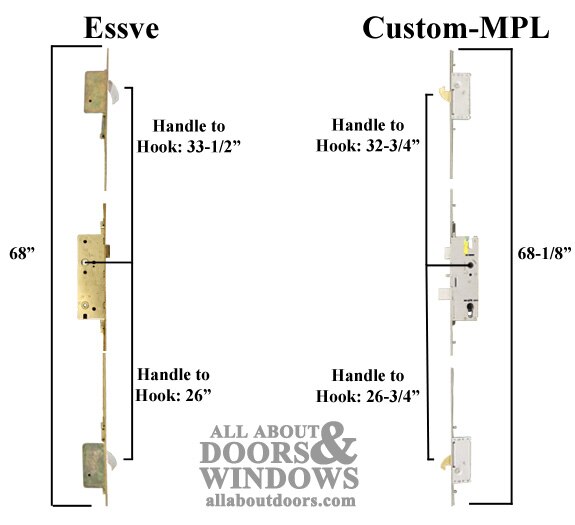
- Remove the multipoint lock from the door edge. At this point, you can lay both locks out next to each other and see the similarities and differences between the two locks:
- Both locks should be of similar lengths
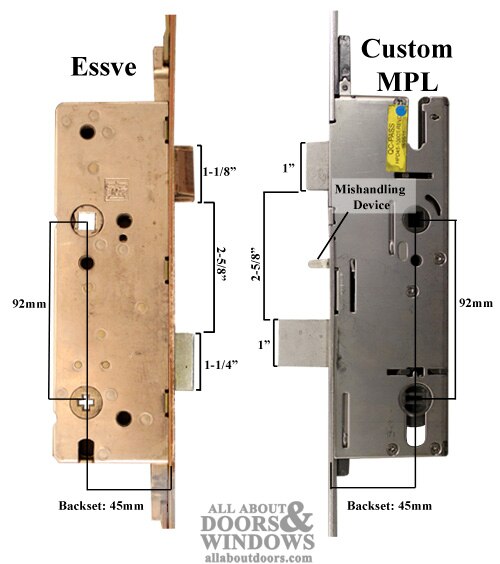
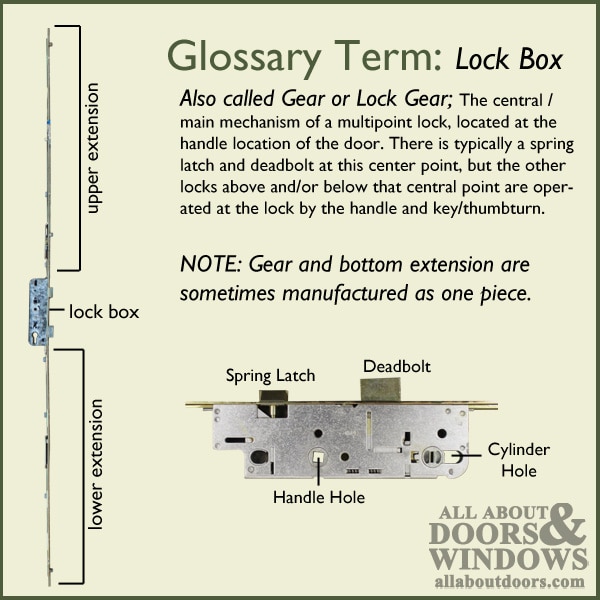
- Lock boxes should be same length and width
- Top of spring latches should line up; Essve deadbolt is slightly wider and located lower on the lockbox than the Custom-MPL deadbolt
- Ends of Custom-MPL faceplate are not rounded like Essve
- Both top and bottom hooks of Essve point downwards; top hook of Custom-MPL lock points upwards
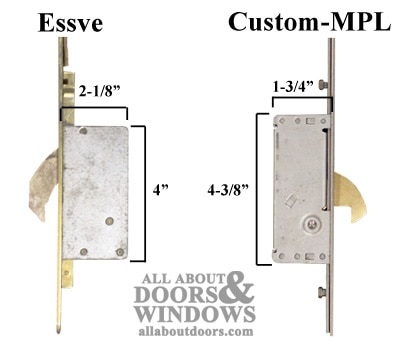
- Hook boxes are in approximately same position; Custom-MPL hook boxes are longer and less deep than Essve
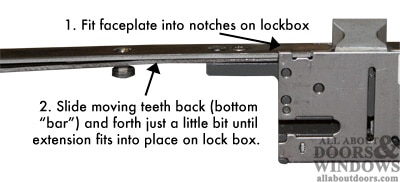
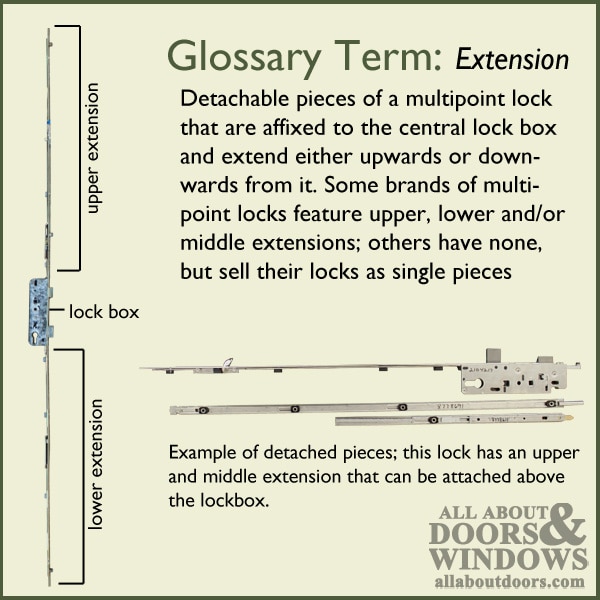
- If new lock is not yet assembled, attach top extension to lock body with provided star-head screws. Hooks and deadbolt must all be retracted. Line up extension with notches on lock box, then slide bottom "bar" of extension (part with teeth) back and forth a bit until the extension fits down into place in the notches of lock box.
- Hold Custom-MPL up to door edge or place in the door edge to see how hook boxes fit in mortises. You may need to lengthen mortises for both top and bottom hook boxes, though by no more than 1/4 of an inch on either top or bottom of each hole. Mark with pencil where new cuts need to be made. Use razor to cut along the line. Use chisel to knock out door edge. Note: do not adjust gear box mortise―make adjustments to hook mortises only.
- Place lock in door edge without securing completely with screws. Mark with pencil where ends of faceplate are located on door edge. Remove lock. Using a razor and chisel again, carefully square off edges of existing radial groove to fit new lock faceplate.
- Place lock back in door edge.
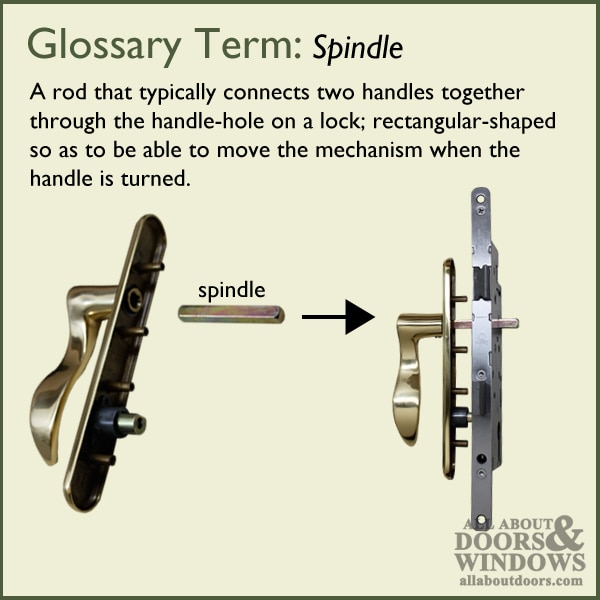
- Insert a handle and spindle into the lock to check lock operation while door is open:
- Door should lock when handle is lifted Note: Mishandling device must be depressed with fingers in order to check lock operation
- If spring latch on lock is facing wrong direction, lock needs to be rehanded. Follow the instructions for rehanding in this article.
- If lock correctly operates, install all screws to secure lock in place.
- Re-install old interior and exterior escutcheon plates, cylinder and handles or install new ones.
- Note: Old handles should be reusable with some modification. May have to grind or rasp out about 1/16 of an inch to lengthen cylinder hole to accommodate Essve handle set. Alternatively, All About Doors & Windows carries new handle sets in a variety of styles and colors that will fit with no modifications.
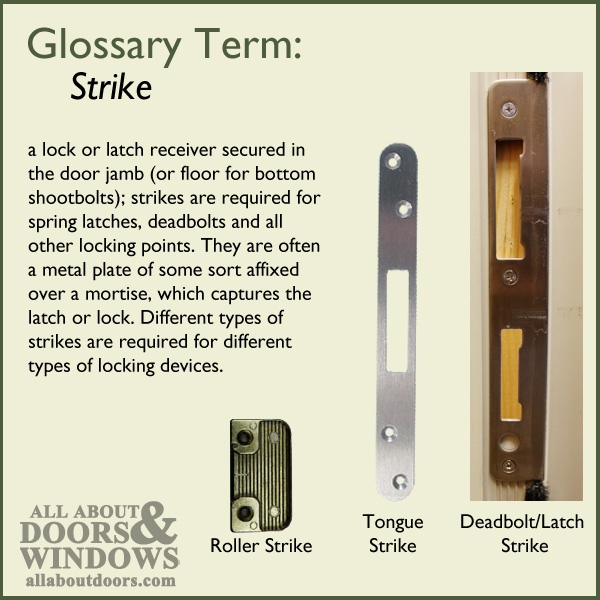
Making the Strike Plates Work:
- Close door and carefully throw deadbolt to see where deadbolt hits strike plate. Old strike plate should work for new Custom-MPL lock.
- If strike plate does not fit, unscrew strike plate, re-throw deadbolt and mark where it hits door jamb. Extend deadbolt mortise in jamb with razor and chisel; also extend shallow mortise so strike plate sits level in jamb after being moved.
- Alternatively, if strike plate does not work, hole in strike plate itself can be extended to reduce exposing unfinished wood in jamb by moving strike. This process requires using Rotozip, hacksaw, file or tool to enlarge existing hole in strike plate.
- Alternatively, All About Doors & Windows has limited quantities of powdercoat silver strike plates that are similar shape and size to the old Essve strike plates if you wish to purchase new matching one. (Contact All About Doors & Windows and ask for part #398007)
- Check alignment of hooks with hook strike plates. Hook strikes may have to be moved or modified in order to work, though fit should be close. If opt to move strike plate, lengthen existing mortise with chisel. If opt to modify strike plate, use Rotozip, hacksaw or file to carefully lengthen hole.
- Alternatively, All About Doors & Windows has limited qualities of stainless steel strike plates that are similar shape and size to the old Essve strike plates if you wish to purchase new matching ones. (Contact All About Doors & Windows and ask for part #398006)

