How to Drill Out a Peachtree IPD Citadel Lock If the Lock Won't Lock
These instructions are intended to teach you how to drill out a Peachtree brand IPD Citadel door when it will not lock.
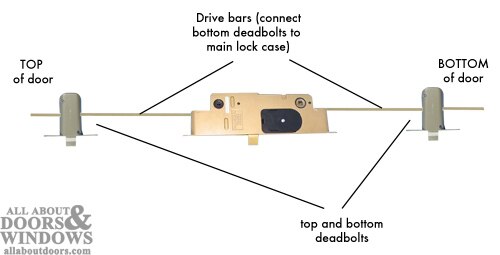
The goal of this process is to access the set screws affixing the main lock to the drive bars on your IPD multipoint lock. Once you can access these screws, you can disconnect the main lock case from the drive bars, take it out of the door and replace it.
Note: Once you have drilled out your Peachtree IPD mortise lock (parts 37400034 (left hand inswing) / 37400035 (right hand inswing)), you will need to replace the main lock case. Order and double-check that your replacement lock is the correct lock before starting the removal process.**
Once you understand the basics of the problem at hand, the solution is simple. The purpose of drilling into the lock is to create another access point through which we can use an Allen wrench to disengage the lock case from the drive bars. The purpose is NOT to strip the screws. Drilling too deep or hard could damage other parts of the lock.
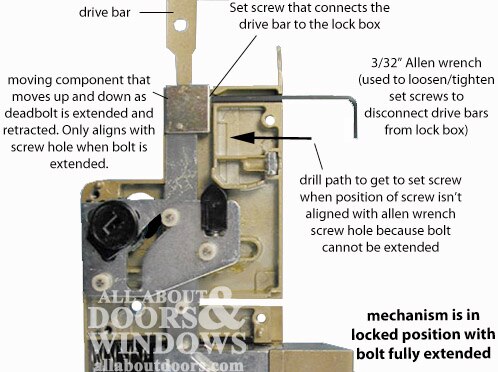
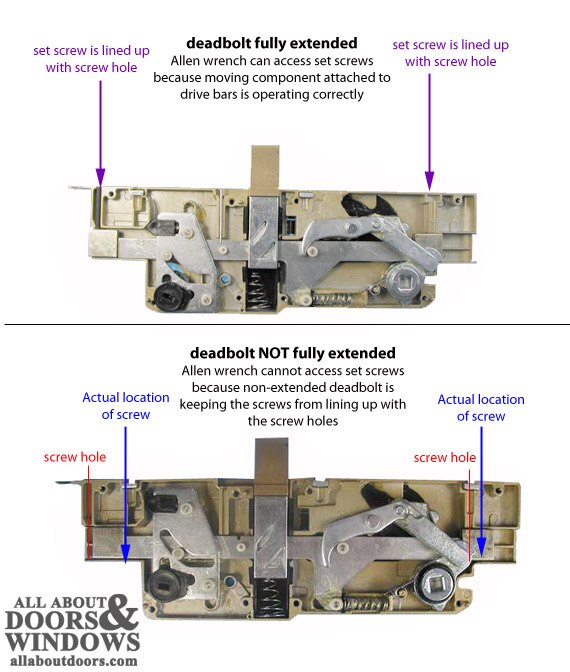
The photos on the next page illustrate the difference between a working lock and one in which the deadbolt will not fully extend. The second photo shows the approximate spot at which you should drill into the lock to reach the set screws.
Working and Non-Working Lock Photos
Note: lock has been disassembled for explanation purposes only. Do not take apart your lock.
Materials Needed
- Allen 3/32 wrench
- Drill with 3/8"bit
- Ruler
- Pencil
- Screwdriver (to remove handles and faceplate)
The Steps
- 1) Remove the door from its hinges and set it so that the lock is facing up (so that the deadbolt is pointing upwards).
- 2) Remove the handles from the door.
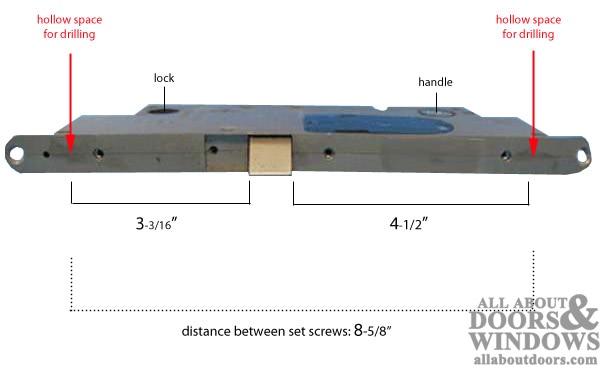
- 3) Remove the faceplate. There should be 3 screws holding it to the door. Once you have removed all 3 screws, remove the faceplate and note 5 holes on the lock: 3 of these are for the screws you just removed; the other 2 are the access holes for the set screws.
- 4) Mark the edges of your latch, and, using a pencil, make a mark 3-3/16” up from the top of the latch and another one 4 1/2” down from the bottom of the latch. This is the approximate location based on a latch that can extend 3/4”. A working deadbolt extends 1”. Keep in mind that if your deadbolt extends more or less than 3/4”, the location of your set screws may differ slightly. This measurement should always, however, get you to the hollow space in which it is safe to drill your lock.
- 5) Drill into the hollow space on the lock using a 3/8” drill bit. Do not drill into the nut for the faceplate screw. After drilling through the first layer of metal, you will feel the drill push into the hollow space. Drill until you feel the bit pop through another layer of metal and stop. Be careful not to drill any farther than necessary to make a hole in the second layer of metal. If you drill too far, you will strip the set screw. The depth of this second layer of metal is 1-1/16” from the front of the lock. To avoid drilling too far, measure this depth on your drill and place a piece of tape at this measurement.
- 6) At this point, you should be able to access the screw. Once you have found one, the other should be easy to find. It is 8-5/8” directly up or down from the first. Use an Allen wrench to loosen the screws. You should then be able to remove your lock.
- 7) If you cannot find the set screws, it may be possible to use pliers to maneuver the bar within the lock down (to the left in our pictures) so that the deadbolt extends. If you can do this, you can use your Allen wrench in the original set screw holes and loosen and remove the screws the same way.
Additional Diagrams