How to Install Deadbolt for Doors with 2 in Backset (Atrium, Morgan, etc)
Installing a Double Cylinder Deadbolt with a Two-Inch Backset
How to Install Deadbolt for Doors with 2 in Backset (Atrium, Morgan, etc)
This is a tutorial on installing part #40510 -- double cylinder deadbolt, and #40502 -- single cylinder deadbolt.
Make sure that the backset of your door is 2 inches. The backset is the distance from the edge of the door to the center of the bore hole (or deadbolt, if you haven't removed it yet).
If the backset of your door is larger than 2 inches, this deadbolt will not work properly and you should probably send it back and get a new one. An easy way to check is to hold the new deadbolt in front of the door and see if the cross-shaped tailpiece hole is in the middle of the bore hole.
Once you've ensured that your deadbolt will fit, it's time to install.
- Stick the deadbolt through the edge of the door and screw it in place.
- Take a flat-head screwdriver, insert it into the tailpiece hole in the center of the deadbolt, and extend the deadbolt. (Alternatively, you can wait, install the exterior cylinder and use the key to throw the deadbolt before installing the interior side.)
- Next, we're going to figure out which cylinder is the exterior cylinder, so we can install that one first. If you're installing a single cylinder deadbolt, the keyed part is the exterior cylinder, and the thumbturn doesn't have a tailpiece. On a double cylinder deadbolt, both cylinders have the same flat tailpiece coming off the end--the exterior cylinder, however, does not have screw holes (because you wouldn't want someone to be able to unscrew the cylinder from the outside!).
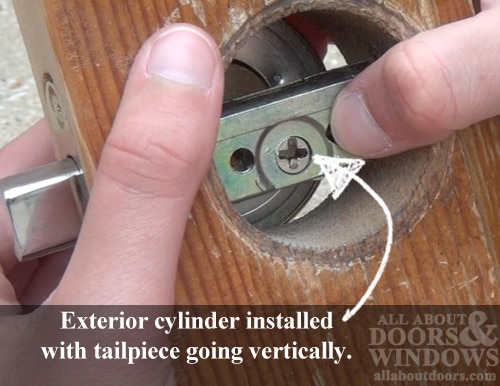
- Slip the collar on the exterior cylinder, and install it on the outside of the door with the tailpiece going vertically through the cross-shaped hole of the latch.
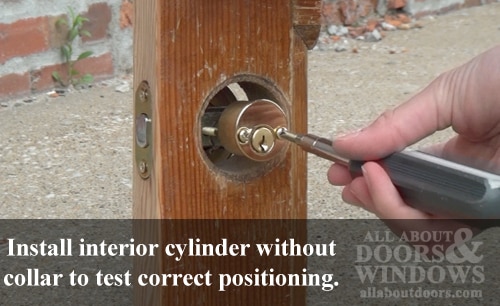
For double cylinder deadbolts: The interior cylinder is going to be installed with the tailpiece going horizontally, to interlock with the exterior tailpiece. However, the interior tailpiece can be flipped 180° and fit into the deadbolt. BUT it only functions correctly one of the two ways. To make sure we have the tailpiece in the right position, install it once without the collar around it. Install the cylinder by fitting the tailpiece in place, and tightening the screws so they go through the deadbolt and connect to the exterior cylinder.
For single cylinder deadbolts: At this point, slip the thumbturn onto the keyed cylinder tailpiece through the interior side of the door. Screw in place, and test that it works correctly. You're done!
- Once you have the screws in place, insert the key and test the deadbolt. Can the key be removed when the deadbolt is extended? Can it be removed when the deadbolt is retracted? If the answer to both of these questions is yes, the tailpiece is going the correct direction. If the answer is no, the tailpiece needs to be flipped.
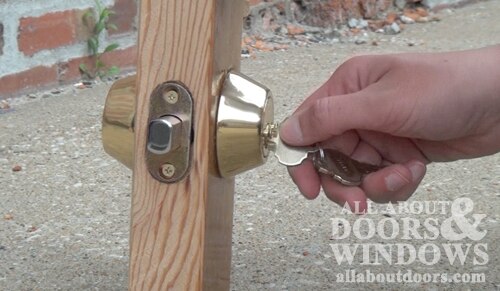
- Re-install the interior cylinder with the tailpiece in the correct position and with the collar in place. This can be tricky, because it's difficult to see whether or not you've got the cylinders perfectly lined up so the screws can be tightened. Just be patient.
- Test the deadbolt again. If everything works correctly, congratulations! You successfully installed a double cylinder deadbolt on your Atrium door.
Note: The hole in our door sample is bigger than it should be in order to show more details. The bore hole on your door should be smaller--about 2-1/8 inches in diameter.
Note: The screws included with this deadbolt are snap-off screws. They can be broken apart at the bald spots (where the thread stops) if they are too long for the thickness of your door.