How to Install Gu/Ferco Multipoint Lock
How to Install Gu/Ferco Multipoint Lock
Installing a GU / Ferco Cremona Multipoint Lock
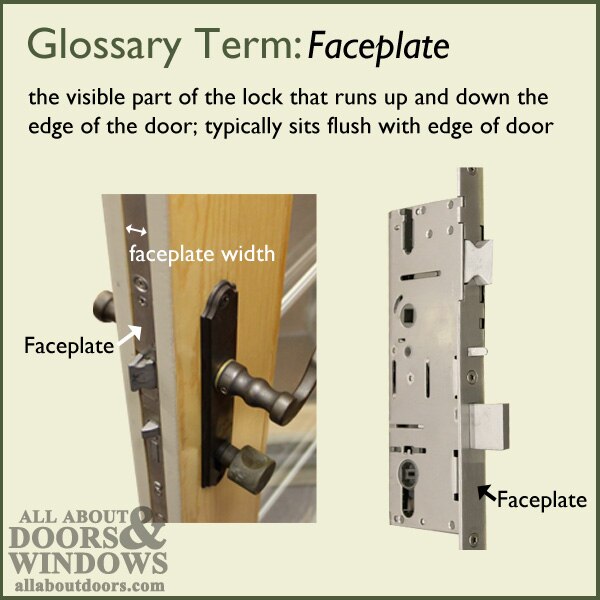
If your lock is not a GU/Ferco lock, this article will not help you. To identify whether or not your lock is a GU/Ferco, look at the lock faceplate for the GU or G-U/Ferco logo (shown in picture below). It should be about 7 inches up from the spring latch.

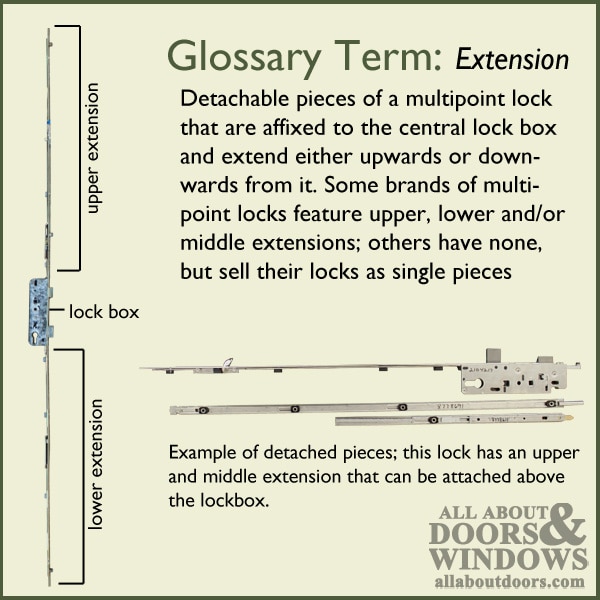
GU/Ferco multipoint locks extend the entire length of the door and typically have at least three locking points: 1) the deadbolt and spring latch at the handle, 2) a locking point at the top and 3) a locking point at the bottom. The locking points at the top and bottom can be a tongue latch, hook, deadbolt latch or shootbolts.
Note: If installing/replacing a lock in an Atrium door, this article may not work for your lock. See our article that pertains specifically to locks in Atrium doors.
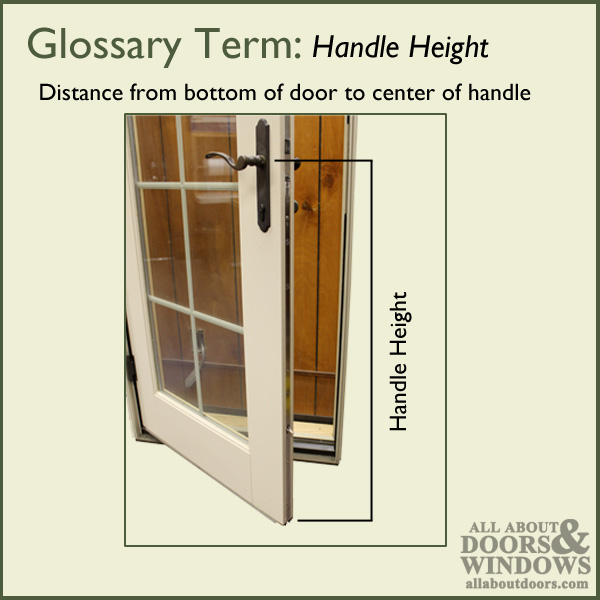
The handle-height on most GU/Ferco locks is 35".
the backset can vary from lock to lock.Make sure the backset of your new lock is the same as the backset of your original lock, so you don't have to re-drill holes in your door.
SUMMARY OF STEPS: (Detailed Steps Follow)
- Remove trim.
- Remove lock from door panel.
- Trim new lock to fit in door panel with shootbolt tip.
- Install new lock body in door.
- Attach shootbolt tip.
- Test operation of lock.
- Modify strike plate to fit deadbolt and spring latch.
- Reinstall strike plate.
- Reinstall trim.
DETAILED STEPS:
To Replace Multipoint Lock:
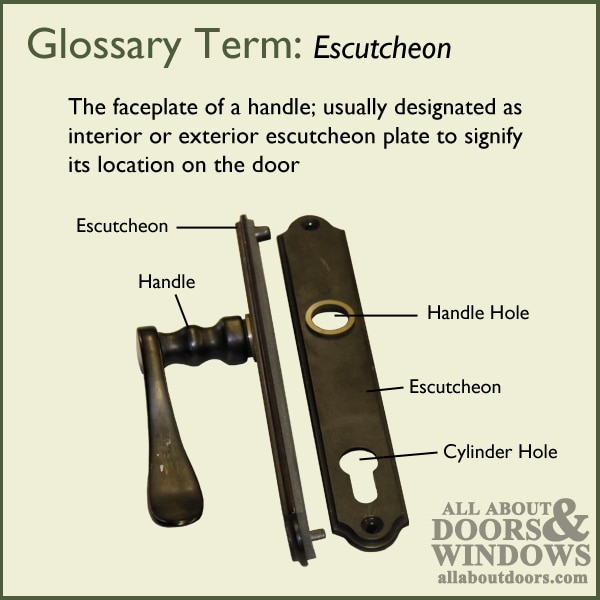
- Remove handles and escutcheons.
- Loosen the set screw on the interior handle with a hex wrench.
- Use a flathead screwdriver on interior side to unscrew faceplate.
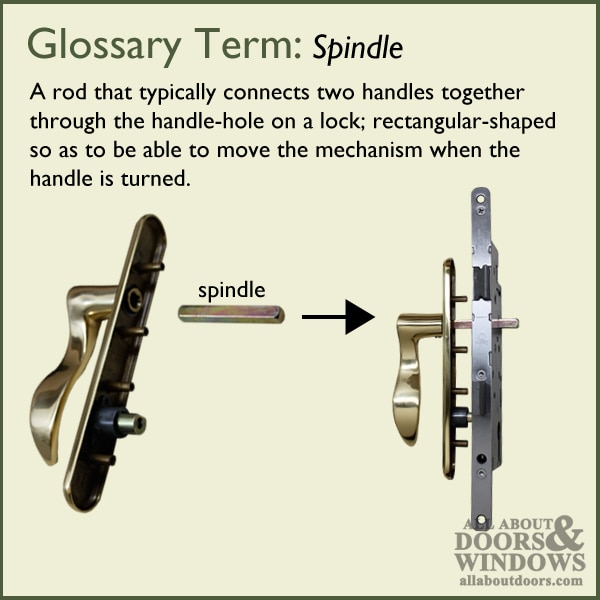
- Remove faceplates; spindle and cylinder tailpiece willl pull out with faceplates.

- Lock runs entire length of vertical edge of door. Remove all screws and remove multipoint lock from door edge.

- If installing a lock with shootbolts, determine how much lock needs to be trimmed to make lock fit in door panel with shootbolt tip*:
- Lay old lock next to replacement lock, lining up bottoms so handles are both at same height. Make sure both locks are disengaged (shootbolt tips and deadbolts retracted)
- If old lock is a two-piece (shootbolt tip can be detached), make a mark on replacement lock to match where heights of locks match up (without shootbolt tips attached).

- If old lock is a one-piece, lay shootbolt tip so top lines up with original lock top. Mark on new lock where the difference must be trimmed down so lock fits in door with shootbolt tip attached.

- Option 1 if old lock is not available: Install bottom gear and secure with 1 or 2 screws. Place shootbolt tip at top of door and mark where alligator teeth will fit into shootbolt tip. Remove lock from door and trim excess.
- Option 2 if old lock is not available: Determine the amount to be trimmed by subtracting the overall length of assembled lock, 81", from the height of your door.
If door panel is 77-1/4" with shootbolt tip 6-3/4", the cut-off would be 3-3/4". So: 81" lock - 77-1/4" height of
door = 3-3/4" amount to be trimmed, i.e. 81 - 77-1/4 = 3-3/4 cut off.
Note: See picture below. When trimming, cut can be about 1/8" short; alligator teeth must fit in conncetor, but connecting plate will cover up a small gap. All three placements shown in the picture are acceptable lengths of lock.

- Once the measurements have been determined, mark this length to be trimmed with a sharpie on the lock itself. Note: Even if your lock does not have shootbolts, you may need to trim your lock to fit the length of the door. Carefully measure and mark lock to height of door.

- Clamp lock to table and carefully trim with hacksaw. NOTE: This step requires caution and knowledge of safety procedures. Watch fingers and keep children away. Extension will be hot during and after cutting.

- Use a file, sandpaper or a sander to smooth cut edge of trimmed extension piece.
- Slip newly trimmed lock body into mortise in door edge.
- If applicable, attach top shootbolt tip by fitting alligator teeth of backplate into connector on shootbolt tip.
- Use fingertips or a screwdriver to slide connector plate over gap between main gear and shootbolt.

- Screw lock in place in two or three places. Stick handle with spindle into lock and check operation with door open. Deadbolt and locking mechanisms should engage when handle is lifted; turning thumbturn should lock deadbolt, locking mechanisms and handle in place.
- If lock functions properly, unlock lock and install and tighten all screws running up and down length of faceplate.
- Close door almost completely, watching how deadbolt and spring latch line up with strike plate. Try lifting handle; if lock was older and deadbolt and spring latch position changed from old lock to new lock, then lock and strike plate are most likely slightly off. Use pencil to mark on strike plate location of deadbolt and spring latch. Apply this same process to the strike plates for tongue, hook and deadbolt latches on top and bottom of lock as well.

- Open door and remove strike plate.
- Using a rasp or file, carefully remove excess material from bottom of each hole in strike plate, about 1/8".

- Reinstall strike plate and test operation.
- Reinstall faceplates and handles, making sure to tighten set screw.
NOTE: If door is greater than 81", attach middle extension (part #40325) to main gear and trim middle extension in the same manner as described above before attaching shootbolt tip.