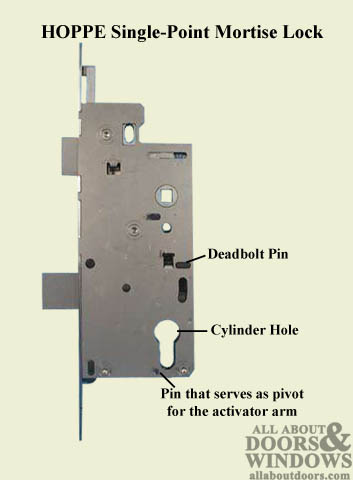
How to Drill Out a HOPPE Mortise Lock if the Dead Bolt Doesn't Retract
Note: These instructions pertain specifically to HOPPE single point mortise locks.
If you operate the thumb turn and the dead bolt will not retract, you can try working the dead bolt back with a putty knife (This is assuming the other locking points have been retracted in the handle operation). If this doesn't work, see the instruction below:
Recommended Tools:
- Bent needle nose pliers
- Cordless drill, with drill bits and Phillips screw driver tip.
- Stiff punch for prying pin
- Small metal chisel
- Hammer
Note: Because of the security of this lock system, the process of drilling out the cylinder to fix the dead bolt will destroy the bottom gear and maybe the cylinder. Call ahead and have a replacement at your site. Remember to get the correct finish when asking for the cylinder so it matches the rest of your lock.
- 1) Remove the handles and trim/escutcheon plates from door.
- 2) Remove the cylinder by drilling out its screw. This is done by drilling next to the cylinder, right through the cylinder screw that holds it in place. To do this you drill through the lockcase cover and the screw at the bottom of the cylinder until the head of the screw breaks off. If the screw is not completely drilled out, you can put a chisel on what is left and break the material with a hammer. Since there is still some material hanging outside the cylinder you will need to pull the cylinder out the side that was just drilled. This way the material does not get caught on or in the lockcase.

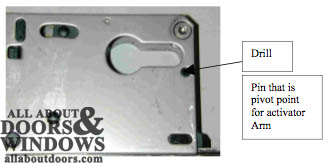
- 3) Drill out the pin that holds the actuator arm. This should allow the arm to release. Using your needle nose pliers, pull the actuator arm out of the lock through the cylinder hole.
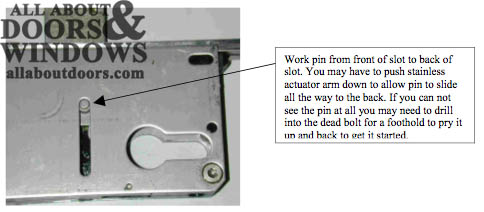
- 4) Depending on the manufacturers route for the cylinder hole you may or may not be able to see the slot for the dead bolt pin. If you can see the slot you can take your punch and pry the pin back see diagram. If you can't see the pin, use your new replacement gear to see which side of the door the slot will be on. Then mark the distance, 5/8 (16 mm), up from the top of the cylinder hole (from the actual hole in the lockcase not the hole you've made in the door). Drill into the door until you hit the lockcase. Remember that the hole has to be straight above the cylinder hole cutout so you can make sure the backplates (Escutcheons from the handle) cover the hole you make. You should now be able to pry the pin back.
- 5) You should now be able to push down on the handles and open the door. If the pin does not want to move or you can not get you punch behind the pin to move it. You can drill into the dead bolt. The dead bolt is stainless, so drilling will only put a small countersink in it. You can then use the dent as a point to pry on with the punch.