How to Replace a FUHR Lock in a Caradco Door
This article pertains specifically to replacing 5- and 6-point locks made by Fuhr for Caradco doors. Caradco manufactured doors in two different heights: 77" (standard 6 foot 8 inch doors) and 93" (standard 8 foot door).
Both locks have rollers (5-point has 2 and 6-point has 3), top and bottom shootbolts and a deadbolt. These locks operate manually and feature a European-style cylinder. Locking points are engaged when door is closed and handle lifted. The inside thumbturn secures the locking devices.
Replacement locks are manufactured by HOPPE and are 3-point locks with shootbolts and no rollers. The replacement locks operate in the same manner as the original FUHR locks.
Replace the 77" 5-point FUHR lock with part #4990236.
Replace the 93" 6-point FUHR lock with part #4990237.
This article applies to both lengths of locks. The only difference between the replacement locks is the height of the top extension.
*Note: If replacing locks in French Caradco doors, both the inactive and active locks may need to be replaced. Note that deadbolt of replacement locks extends 1 inch. If you plan on keeping original FUHR inactive lock, make sure 1" deadbolt will be able to fit into mortise in astragal. Instructions on replacing inactive lock component are pending.
Take appropriate safety measures and precautions when removing, changing, cutting and replacing locks. Safety eyewear and gloves are highly recommended, especially when cutting.
Summary of Replacement Process (Detailed Steps Follow)
- Remove existing lock.
- Measure and trim new shootbolt extensions.
- Connect gear box and middle extension and install in door.
- Connect/install shootbolt extensions.
- Test lock.
- Check that original strike plate works correctly; if not, adjust as needed.
Detailed Replacement Process
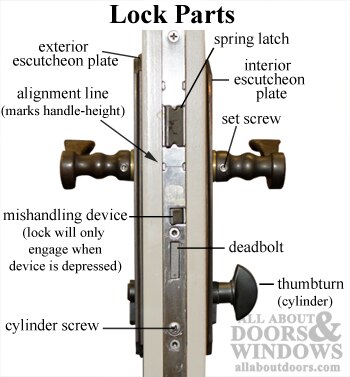
- Use a pencil to mark handle height and alignment line on edge of door panel before removing lock. New lock has to be installed at same handle height.
- Loosen set screws on base of handles, and remove handles.
- Remove interior / exterior escutcheon plates.
- Unscrew cylinder screw on door edge (where latch is located), and remove cylinder.
- Lock runs entire length of vertical edge of door. Remove all screws.
- Remove the multipoint lock from the door edge.
- Lay new lock parts next to original lock--align the handle-height of the lock bodies (there is a line to indicate handle-height on the front faceplate of the lock body). Note dimension similarities and differences:
- Lock body should be similar length and width.
- Deadbolts are different widths and in different locations.
- Old lock is in one piece; new lock is in 4 pieces:
- Lock body
- Middle extension
- Top shootbolt
- Bottom shootbolt
- Old lock had rollers and shootbolts; new lock has shootbolts but no rollers.
- New lock features a mishandling / anti-slam device; this is a small latch between the spring latch and deadbolt, which keeps the lock from engaging when the door is not closed or flush in the frame.
- Different overall length: when new lock is assembled, it is taller than the original FUHR lock; top and bottom shootbolts will both need to be trimmed.
- Attach (won't stay permanently attached until installed) the new bottom shootbolt to the gear/lock body. Make sure that the faceplate of the gear is flush with the faceplate of the shootbolt.

- Measure how far past the original lock bottom the new new lock extends. It should be approximately 2-3/4" too long, but double-check. Depending on whether your handle is exactly 35-1/2" from the floor, it may be slightly off from that. Mark line where shootbolt must be trimmed with a marker.
- Trim bottom shootbolt.
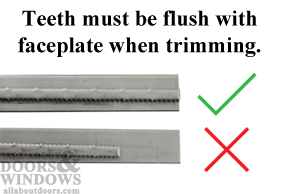
- Slide teeth of shootbolt so that teeth and faceplate are flush.
- Clamp shootbolt down to a sturdy table or surface.
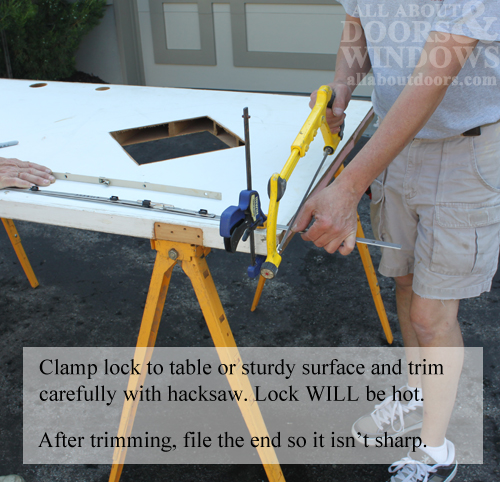
- Trim shootbolt where indicated using a hacksaw.
- Be careful. Shootbolt WILL be hot after trimming.
- File end of shootbolt so it isn't sharp.
- Slide teeth of shootbolt so that teeth and faceplate are flush.
- Attach middle extension to lock body and again make sure that the new and original lock bodies are perfectly aligned at the handle-height.
- Line up extension with notches on lock box, then slide bottom "bar" of extension (part with teeth) back and forth a bit until the extension fits down into place in the notches of lock box. Tighten screw in place.

- Next, again making sure that the handle-heights of the original and new lock are lined up, attach (won't stay permanently attached until installed) the new top shootbolt to the middle extension.
- On a 77" Caradco door (using kit #4990236 as a replacement), the top shootbolt should be approximately 3" too tall, but double-check. The goal is to make the lock fits the door.
- On a 93" Caradco door (using kit #4990237 as a replacement), the top shootbolt should be approximately 1-3/4" too tall, but double-check. The goal is to make the lock fits the door.
- Trim top shootbolt the same way you trimmed bottom shootbolt.
- Install lock body and middle extension into mortise in door. Loosely screw in place.
- Attach bottom shootbolt, loosely screwing it in place. Make sure that the actual shootbolt tips are not extended when attaching shootbolts. Likewise, the deadbolt should not be extended on the lock body.
- Attach top shootbolt in the same fashion.
- Test lock by inserting spindle and handle into handle-hole. Use cylinder to ensure that lock can be properly secured (lift of handle engages locking points; twist of thumbturn secures lock). Note: mishandling device must be pressed down in order to engage tongue and shootbolt.
- If door functions properly, unlock lock and install and tighten all screws running up and down length of faceplate.
- Reinstall cylinder, trim and escutcheons.
- Old Caradco strike plate will fit new lock, although it may need shifted up or down slightly. If strike plate location needs adjusted, unscrew strike plate, mark where deadbolt hits jamb, use a chisel to notch out existing deadbolt mortise to fit new deadbolt and reinstall strikeplate in new location.
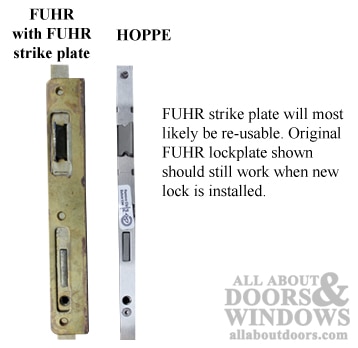
- Strike plate can also be replaced with new HOPPE strike plate. There are many different finishes available here.