Replacing a FUHR Roller-Style Multipoint Lock with HOPPE Roller / Shootbolt Lock
Replacing a FUHR Roller-Style Multipoint Lock with HOPPE Roller / Shootbolt Lock
FUHR no longer ships its products to the United States and direct replacements for FUHR products are not readily available. All About Doors & Windows can help you find a replacement for your FUHR multipoint lock.
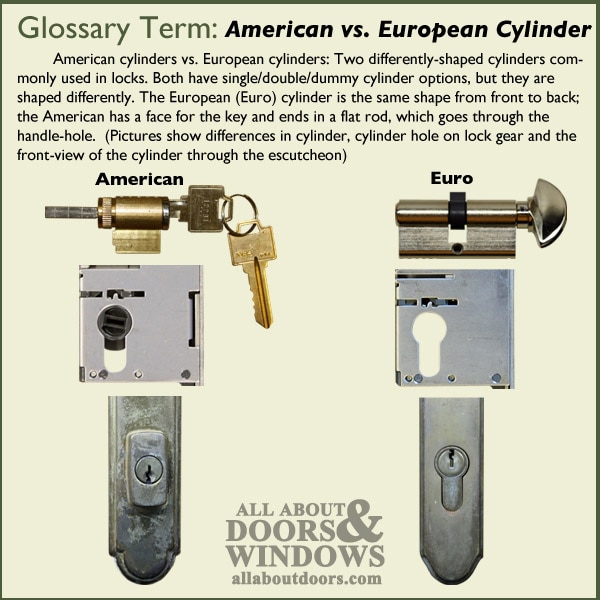
This article pertains specifically to replacing a FUHR roller-style multipoint lock. This article applies to both automatic and manual version of this lock (what does this mean?). This lock features a euro-style cylinder and has two roller-style bolts that engage with strikes in the door jamb. The automatic version has an additional auto-release roller, which triggers the locking action when the door is closed, so door automatically locks when door is closed.
If you do not already have your replacement lock, use the list below to find the correct lock to replace yours. For replacement part number, look below to find original lock part number and its corresponding replacement (click on "picture" to see diagram of original FUHR lock):
- 499010099 (PICTURE) Replace with: 4990275
- 499010199 (PICTURE) Replace with: 4990275
- 499010299 (PICTURE) Replace with: 4990275
- 499010399 (PICTURE) Replace with: 4990280
- 499010499 (PICTURE) Replace with: 4990285
- 499010699 (PICTURE) Replace with: 4990280
The replacement process is the same for all the locks above. Replacement is an easy process that requires some simple modification of the doorjamb.
Summary of Replacement Process (Detailed Steps Follow)
- Remove existing lock.
- Trim middle extension of new lock to fit with top extension in door panel.
- Attach middle and upper extensions.
- Install lock.
- Modify or replace deadbolt strike plate.
- Install new shootbolt socket strike.
- If necessary/desired, add a piece of trimmed extension faceplate to bottom edge of door panel if there is exposed mortise

Detailed Steps
First Things First: Remove the Old Lock

- Use a pencil to mark height of handle and alignment line on edge of door panel before removing lock. New lock has to be at same handle height for rollers to line up with jamb-side strikes.
- Loosen set screws on base of handles, and remove handles.
- Remove interior/exterior escutcheon plates.
- Unscrew cylinder screw on door edge (where latch is located), and remove cylinder.
- Lock runs entire length of vertical edge of door. Remove all screws.
- Remove the multipoint lock from the door edge.
- Compare new lock with old lock; note dimension differences and similarities:
- Lock body is similar length and width
- Deadbolts are different widths and in different locations
- When put together, new lock is longer than FUHR
- Faceplate length from bottom to handle may be shorter or longer on HOPPE depending on which FUHR lock is being replaced
- Distance from handle down to bottom roller is same on both locks
- HOPPE doesn't have any rollers above the lock body
- HOPPE locks come with a mishandling device between the deadbolt and spring latch, which keeps the lock from engaging unless door is closed (mishandling device is depressed); this prevents the lock from banging up the door jamb
Trim That Lock (If You Need To)
If you were to assemble the entire HOPPE lock, it would be too tall for your door. The top extension (the one with the shootbolt) needs to be trimmed before the lock can be installed.
- Attach the middle extension to the lock body using a screwdriver. Leave the top extension off for now. Make sure lock is in unlocked position.
- Place lock into mortise in door edge, making sure handle alignment line matches up to line drawn in step 1. If lock is too long on bottom, mark where lock needs to be trimed, and carefully use a hacksaw to lock down to size.
- Take top shootbolt extension and hold it up to door so top (with shootbolt NOT engaged--in unlocked position) lines up with top of door panel. Mark on top extension where middle extension overlaps it--this is how much neds to be trimmed off top shootbolt.

- Remove lock from door edge. Measure twice, cut once: ensure that proper amount of top extension is removed so lock will fit in door edge and shootbolt can be properly engaged with door jamb (hole will be drilled later).
- Using a hacksaw, carefully trim through both serrated edge and faceplate of top shootbolt extension. Note: This step requires caution and knowledge of safety procedures. Have another person hold the extension or use a clamp and pliers to hold extension while trimming. Extension will be hot during and after cutting.

- Use a file or sandpaper to smooth cut edge of trimmed piece.
Note: Alternatively, HOPPE lock may be shorter on bottom than FUHR. If desired, you can use an extra piece of faceplate trimmed off of top extension to fill in the gap.
Installation
- Place lock (with attached middle extension) in mortise (big hole in door edge). Align handle height to mark made at alignment line of old FUHR lock. Install one or two screws to check operation before installing the rest of the screws.
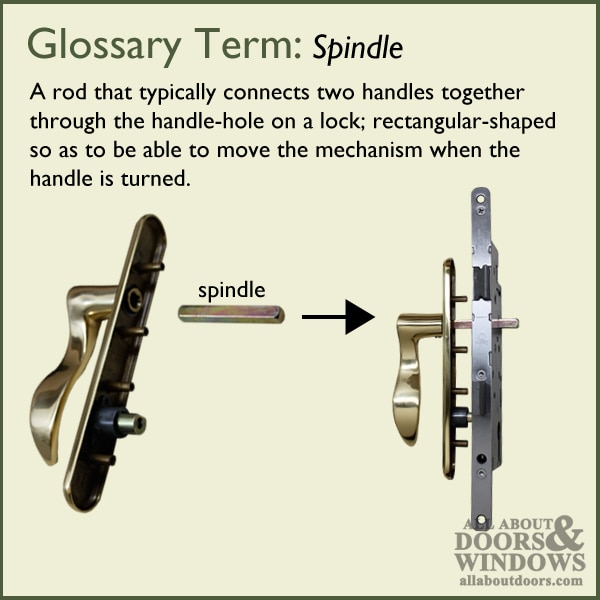
- Insert a handle and spindle into the lock to check lock operation:
- Check lock while door is open so lock is visible and accessible if not operating correctly; to check lock while open, mishandling device between deadbolt and spring latch must be pushed in with fingers or lock will not work.
- If lock is functioning correctly: roller and shootbolt will engage when handle is cocked up; roller and shootbolt will disengage when handle is pushed down. Note: if original FUHR lock was an automatic lock, note that new HOPPE lock will NOT lock automatically when door is closed. Handle must be cocked and deadbolt engaged with thumbturn or key to fully lock door.
- If door functions properly, tighten and install all screws and attach top extension. Do this by ensuring that the serrated section of middle extension is sitting inside the locking bit on the top shootbolt extension. Screw top extension in place.
- Reinstall interior and exterior escutcheon plates, cylinder and handles.
- Gently check operation of lock while closed. Deadbolt strike plate will most likely not work in its current position. If you wish to reuse the FUHR strike plate, it can be moved up or down within the door jamb or modified with a hacksaw to enlarge the holes in the strikeplate. Alternatively, allaboutdoors.com carries a large selection of HOPPE strike plates that can be installed in place of the FUHR.
- In the head of the door jamb, there should be a small mark where the shootbolt hit it. This is where a hole needs to be drilled and the socket strike installed.
- Roller strike should be usable in its original position. Move up or down in door frame if necessary.
Note: We suggest you leave the top roller strike (and auto-release roller strike if original was an automatic lock) in place in your door jamb. It will not be used. Strike can be removed if desired--mortise will require patching and/or painting or staining.