Guide to Jordan Company Windows
Jordan Co., a window manufacturer, went out of business in early 2009. The company's windows are no longer available, but All About Doors and Windows sells replacement parts, so you don't have to replace your Jordan windows, which may still have a lot of life left in them and will almost definitely outlive their smaller components. Accidents and general wear and tear often require that window parts be replaced.
This guide includes instructions and pictures on caring for your Jordan Co. single-hung tilt windows.
There is also a video on how to install channel balances in a Jordan window at the bottom of the page or on our Youtube channel.
This includes how to remove the lower sash of the window, how to replace the channel balances and how to remove and replace the balance block from the channel balance.
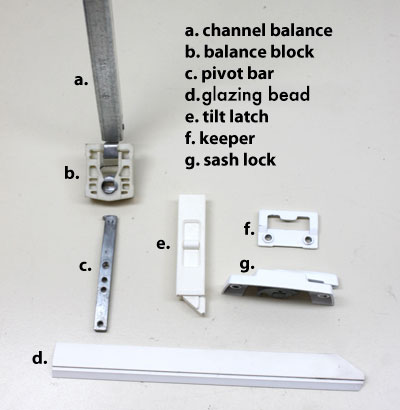
Parts a, b, c, e, f and g are available for online purchase. Call if in need of vinyl balance cover
a: 62-series channel balance--must know weight and length of sash
b: Balance block- part #62831
c: Pivot bar- part #532030
e: Tilt latch
f: Sash lock keeper - part #500187
g: Sash lock- part #50094
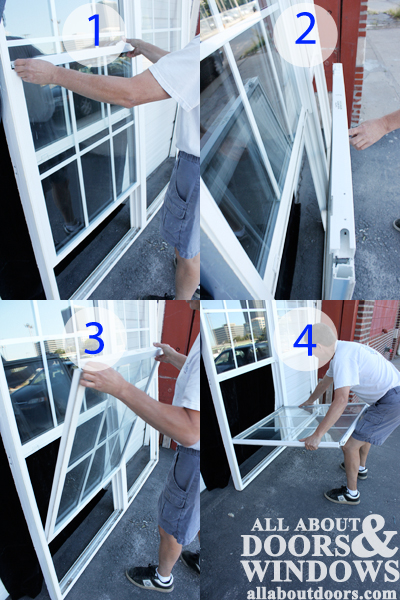
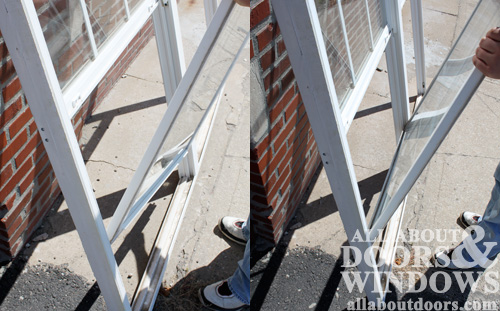
To Remove the Sash:
- Unlock the sash lock and raise your window. The sash lock is located at the top of your lower window sash. The latch flips to one side to unlock the window so it can be moved up and down.
- Slide the tilt latch. You should feel the balance blocks unlock. Tilt the window sash towards you.
- Tilt the sash clear out so it is nearly horizontal, or so that the glass is almost parallel to the ground. You should be able to see how the pivot bars hold the window to the balance blocks in the jamb.

- Twist one side of the sash so that the pivot bar slides out of the balance block and lift the sash up and out of the window frame.
How to Remove the Sash (In Pictures)
To Replace the Channel Balances:
The Jordan Company single-hung tilt windows operate using a channel balance system. The channel balance is affixed inside the window frame and covered by vinyl balance covers. A balance block attaches the cord to the moving lower sash. This piece moves up and down with the sash when it is raised and lowered.
**NOTE: Window balances are pulley mechanisms designed to take on the weight of the window to make them easy for consumers to open and close. When you remove the sash and work with the balance, it will be under extreme tension because it typically holds up your 20+ pound window. Be careful and aware, as a misstep can cause the balance to snap back. Read all instructions carefully.**
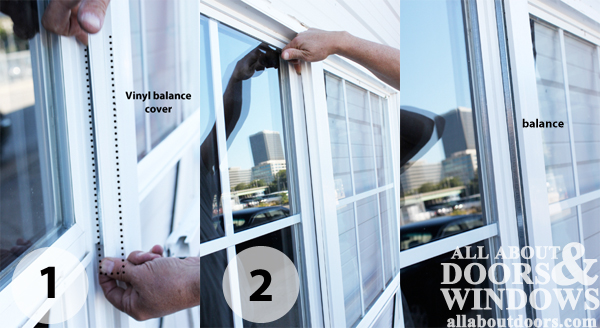
First Things First: Remove the Balance Cover
- Now that the lower sash is out of the window, you should be able to stick your fingers underneath the vinyl balance cover that sits in the jamb.
- Working your way up the window, carefully pull up the balance cover until the entire thing has cleared the window and you can remove it.
You should now be able to see the metal channel balance.
Next: Let's Get to the Balance
You should now be able to see the metal balance and the cord stretching from beneath it to the balance block, which appears to be jammed in the track. Before we can remove the main pulley mechanism of the balance—part of the metal casing we revealed when we removed the balance cover—we have to unlock the balance block. This will allow it to move up and down within the window frame like it typically does when the sash is in place.
- Insert a screwdriver into the metal center of the balance block and carefully turn one way or the other so that the groove isn't facing up. Do not remove your screwdriver. Be aware that when you turn the center, the cord will tense and tighten. Hold onto it with your screwdriver.
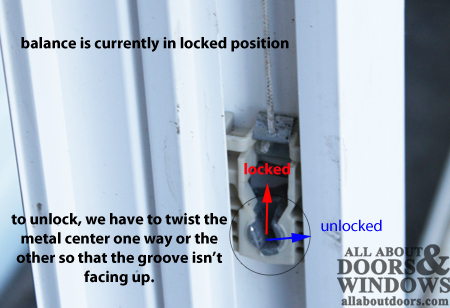
- Slowly slide the balance block along the track up until it hits the channel balance. Now you can remove your screwdriver.
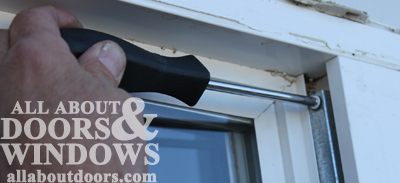
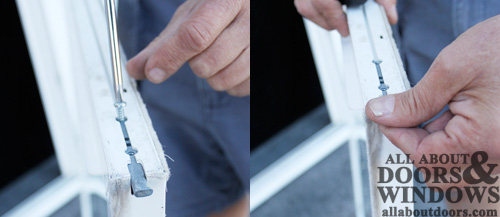
- The channel balance is held in by a screw at the top. Remove the screw from the balance. The entire mechanism should now be able to freely move in the track.
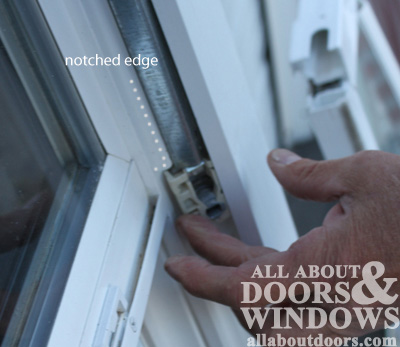
- Remove the balance from the tracks. There should be a notch in the edging towards the middle of the window that fits the shape of the balance block. Slide the entire mechanism down to align the balance block with the notch and slip it out of the window.
- If there is no notch, measure your balance block, slide it up or down so it isn't on the track where you plan to carve a notch and carefully use a knife or small saw to make a space for your balance block to fit through.
Should You Need to Remove/Replace the Balance Block from the Channel Balance
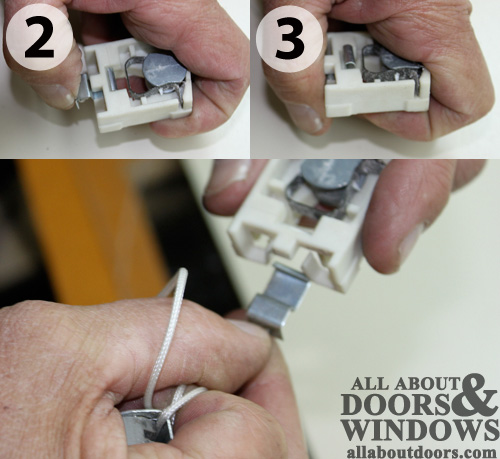
Just like when we were unlocking the balance block to slide it up to the channel balance in the window, it is very important to be careful and aware of the tension of the balance when working with the balance block. Now that our entire balance system is out of the window, no cord is extended, but it is still under great tension. Because the balance block is attached to the end of the cord and it is bigger than the opening of the channel balance, the cord is being kept from snapping into the pulley. When we remove the balance block, however, that will no longer be the case.
Have handy an extra set of fingers, a powerful clamp or strong needle nose pliers to hold onto the cord and keep it from snapping back into the system while you replace the balance block.
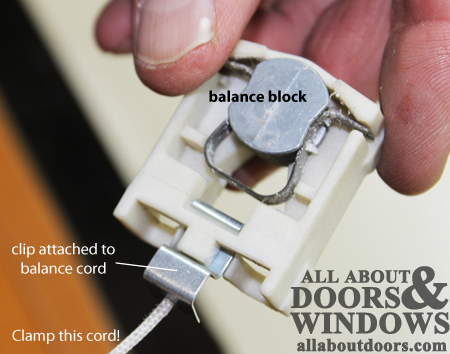
- Carefully pull the balance block and the attached cord out a bit, say 6 inches, from the channel balance. Wrap the cord around your finger (or someone else's) or clamp the cord near the channel balance with a clamp or pliers.
- Put your thumb on the big flat part of the clip and push down and back.
- The clip should lift up a bit, allowing you to work it out of the balance block.
Now you can replace the balance block. The clip refastens the same way you took it off. Remember to work the balance block back up to the channel balance again when you reattach it. Do not just release the cord from your fingers, clamp or pliers. The cord will snap into the balance and possibly hurt you.
Now to Put the Balances Back In
The balances go back in the same way they came out.
- Slide the whole balance mechanism into the window frame, being careful to work the balance block through the notch in the edging.
- Secure the channel balance in place in the window frame with a screw in the same spot you removed it.
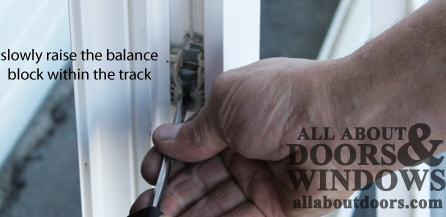
- Taking your screwdriver again, slowly slide the balance block down into the tracks. Line up the balance blocks on both sides. This is where you'll be putting your window sash back in; it won't go in smoothly or easily if one side is higher or lower than the other. It is a good idea to wear safety glasses when moving the balance block down in the tracks. Once you have the balance blocks lined up with each other, use the screwdriver to turn the metal center of the balance block to the locked position, in which the groove is pointing up. This is where the pivot bars land when you re-insert your sash. Tilting the sash back into the window will cause the block to unlock and you'll be free to smoothly move your window up and down.
Putting the Sash back In
The sash goes back in the same way it came out.
- Gripping the top of the window sash, twist the window so you can get the pivot bars into the tracks.
- Slip the pivot bars into the channel balances. Tilt the sash in towards the window so it is parallel to the window frame. Your window is now in place.
- Lower the window.
Replacing Other Parts and Cleaning
Cleaning
While you have your balances out of the window itself, you can clean the inside tracks if needed. Either wipe these down to remove dust and dirt or use silicone spray. Do not use any other cleaning products, as they could cause the tracks to become sticker and your moving sash to stick.
Balance Covers
Once you replace your balances, you can replace the vinyl balance covers if needed. These snap in and out easily.
Pivot Bars
While your window is out, it is a good time to install new pivot bars if they are broken or need replacing. Note: If your pivot bars break off into your balance block, it is extremely important to wear safety equipment (glasses at least) and be aware of the tension of the balance when you go to remove the pivot bar piece. Use a clamp or pliers to cut off tension while you remove the bar from the balance block. Replacing the pivot bars is easy once you get the broken piece out of the balance block. Simply unscrew the 2 screws affixing the bar to the sash, slide out the bar, slide in a new one and re-screw it in place. If your pivot bar is broken and you have nothing to grab onto to get ahold of the pivot bar, stick the screwdriver down into the track (through the screw opening) and push the pieces out.
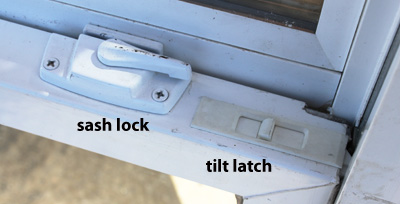
Sash Lock, Tilt Latch and Keeper
Replace these while your sash is out of the window. The sash lock and keeper should all be affixed with screws. The tilt latch snaps in place and can be removed with a screwdriver. Make your measurements carefully and install all new replacement parts where you removed the old ones.
How to Install Channel Balances in a Jordan Window
The staff at All About Doors & Windows spends a considerable amount of time creating articles and providing quality parts and hardware. We know you can find many of these products elsewhere and we appreciate your business. We thank you for your time and hope you will continue being a satisfied customer.