How to Replace Schlegel Multipoint Lock
How to Replace Schlegel Multipoint Lock
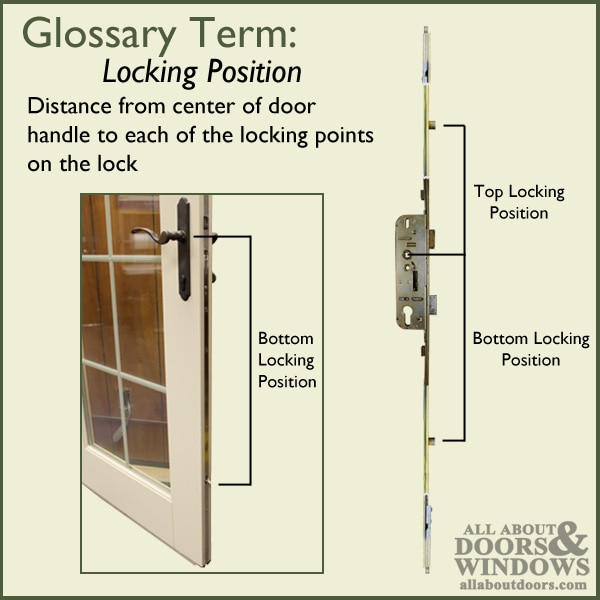
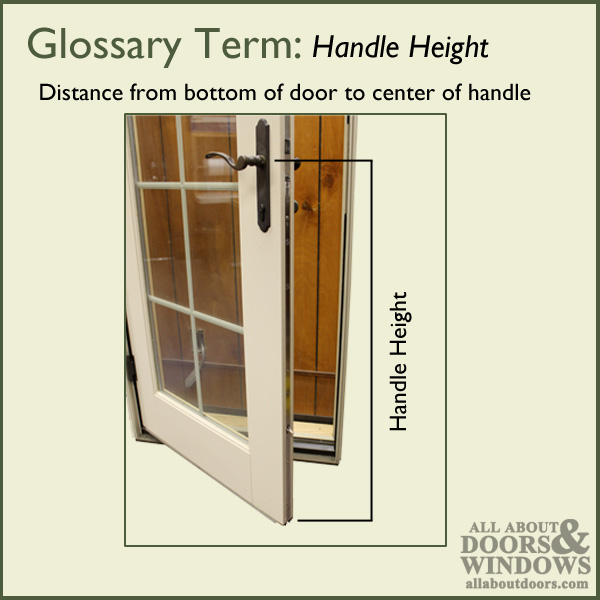
These instructions pertain specifically to replacing a 3-point Schlegel lock with deadbolt locking points. This multipoint lock has a bottom locking position of 25-5/8 inches and a top locking position of 25-5/8 inches. The handle-height can be anywhere from 30-1/2 to 39-1/2 inches and it fits in doors up to 86 inches tall. The links below will take you to the original lock listings.
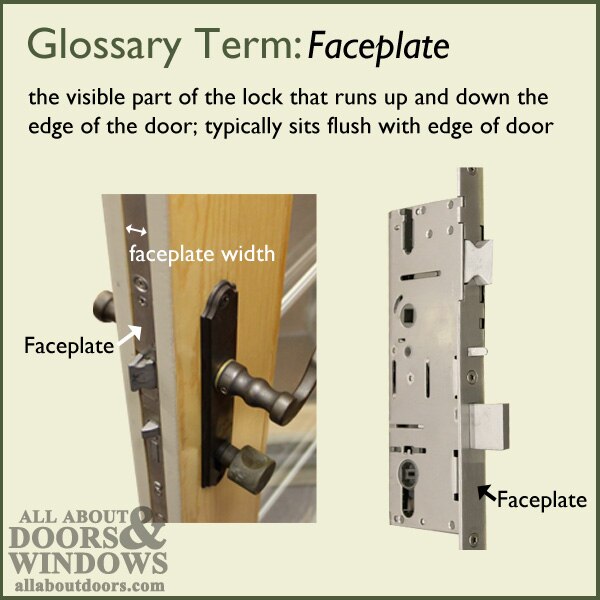
Lock will be replaced with a HOPPE multipoint lock with tongues. This is NOT a perfect replacement; modification required. The biggest issue is the difference in faceplate width and handle PZ spacing.
The lock is shown in the picture below. If this is NOT your lock, this article may not help you.

Schlegel no longer manufactures these multipoint locks, but in the event of a break or common wear and tear, it can be replaced with a HOPPE multipoint lock. We will continue to look for other replacement options as we find different versions.
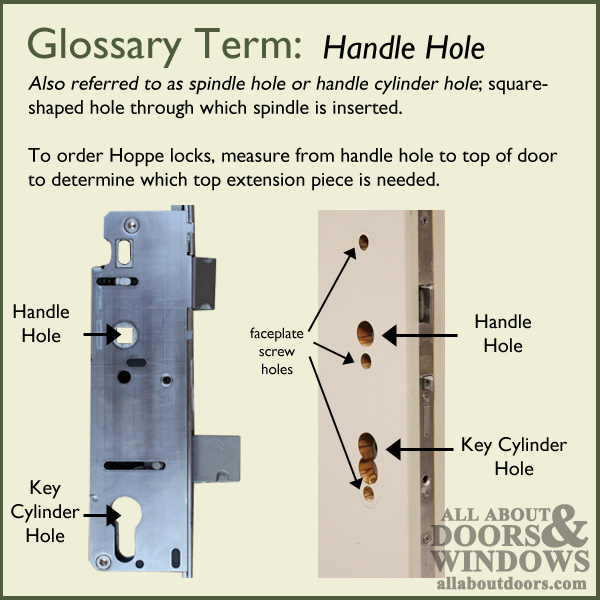
The diagram below shows the original Schlegel lock next to the HOPPE replacement. HOPPE replacement will be installed so cylinder matches up to original cylinder hole in door. Because of the different PZ measurements, the handle-hole will need to be redrilled to accomondate the new lock.

Before you can replace your Schlegel lock, you need to know whether the backset is 45 or 55mm. If backset is 45mm, it will need to be replaced with a HOPPE 45mm backset lock. If the backset of your original Schlegel lock is 55mm, you need to order a 60mm HOPPE lock to replace it with; you will need to widen the cylinder hole by 5mm.
Note: You will not be able to re-use your old handleset with your new HOPPE lock due to the change in PZ.
How to Replace a Schlegel 3-Point Lock
Materials:

- New HOPPE lock (part #4990283)
- Hacksaw
- Clamp
- Tape Measure
- Pencil
- Screwdriver
- Drill with paddle bit
Summary of Steps (detailed steps to follow):
- Remove handleset/trim.
- Remove Schlegel lock from door panel.
- Trim HOPPE lock to fit in door panel (with cylinder aligned with original cylinder location).
- Modify cylinder hole, if necessary, and handle-hole to fit new lock.
- Remove lock and drill new hole for handle at marked spot.
- Install HOPPE lock (with top shootbolt attached) and install several screws to hold in place.
- With door open, check operation of lock to be sure lock functions properly. Depress mishandling device on lock; lift handle to engage the two locking tongues, and push handle down to retract.
- Apply all additional screws and tighten until snug. Do not over-tighten. Check lock function.
- Check fit of strike plates and adjust as necessary.
Detailed Steps:
- Unscrew and remove handleset and trim plates.
- Remove all screws from faceplate of lock; remove Schlegel 3-point lock from door panel.
- Set new HOPPE lock in mortise (with top shootbolt unattached). Secure it with a few screws so that cylinder is at the same height as Schlegel was (lock body should sit at same height as Schlegel).
- Mark handle alignment line on door edge. Measure from handle alignment line to top of door.
- If replacing a 45mm Schlegel lock, follow step 5a; if replacing a 55mm Schlegel lock, follow step 5b.
- On broad side of door, measure up 3-5/8 inches (92mm) from the center of the cylinder (which should be visible
 through cylinder hole in door) and mark spot. New PZ (handle-to-cylinder spacing) of HOPPE lock is 3-5/8 inches (92mm), about 15/16 of an inch (24mm) longer than PZ of Schlegel.
 - On side of door, at cylinder hole, measure 5mm away from locking edge of door and mark measurement. This will be the location of the new cylinder hole. From center of new cylinder hole location, measure up 3-5/8 inches (92mm) and make a mark. This will be location of new handle-hole.
- On broad side of door, measure up 3-5/8 inches (92mm) from the center of the cylinder (which should be visible
- Remove lock from door and lay down on table.
- Sticking handle and spindle into handle-hole, turn lock so that tongue locks and deadbolt are engaged. Take new top shootbolt extension and pull on serrated piece until it is flush against back plate of extension.
- Lay top shootbolt next to full lock (with attached middle extension) so top of shootbolt (with bolt extended) sits where the top of door should be (as determined by the measurement in step 4). Top shootbolt extension will overlap middle extension. This overlapping part of the top shootbolt is what needs to be trimmed.

- Measure and mark twice to ensure that the proper amount of top extension is removed so lock will fit in door edge and shootbolt can be properly engaged.
- Using a hacksaw, carefully trim through both serrated edge and faceplte of top shootbolt extension. Note: This step requires caution and knowledge of safety procedures. Have another person help hold the extension or use a clamp and pliers to hold extension while trimming. Extension will be hot during and after cutting. Do NOT use powertools for this step; lock finish can be ruined.

- Use a file, sandpaper or sander to smooth cut edge of trimmed extension piece.
- Before re-installing lock, drill new cylinder hole (if necessary as determined in step 5) and handle-hole in broad side of door. Drill holes to same size as original cylinder and handle holes respectively.
- Affix top shootbolt to HOPPE lock by sliding the toothed edge of the middle extension into the receiver of the top shootbolt. Install cover plate to keep middle and top extensions from becoming misaligned. Note: Shootbolt extension can be adjusted up or down a bit if not quite flush with top of door--move the teeth of the middle extension up or down within the receiver until lock is in proper position.

- Place full lock into mortise in door, being careful to align lock with handle-alignment mark. Screw loosely in place--install a few screws up and down the length of the lock.
- Insert a handle and spindle into lock to check lock operation while door is open. Note: new lock has a mishandling device which must be pressed down in order to engage locking points.
- If door functions properly, unlock lock and install and tighten all screws running up and down length of faceplate.
- With door closed, gently engage locks. Shootbolt will make a mark in door jamb.
- Use a paddle bit to drill a hole in jamb for shootbolt to reach into. Instal socket strike or shootbolt strike plate.
- Check that strike plates match up with lock. Strike plates are all reusable and shouldn't require adjustment.
- In the event that strikes are slightly off, unscrew strike plate, chisel where needed, and move strike plate up or down within door frame.
- Install new trim and handleset; PZ must be 92mm. If replacing handlset on a new 60mm HOPPE lock, make sure new trim is wide enough to cover both new and original cylinder holes (handleset should be at least 2" wide).
Note: Original Schlegel had 1 inch (25mm) wide faceplate; HOPPE faceplate is 20mm. Difference is small but may be noticeable in the form of a slight gap on door edge where mortise is visible.