HOPPE Cylinder Installation and Lock Rekeying
Convert A HOPPE 90º Cylinder Into A 360º Cylinder Install a 90º Cylinder in a Mortise Lock
Installation Instructions for 90° Turn Cylinder
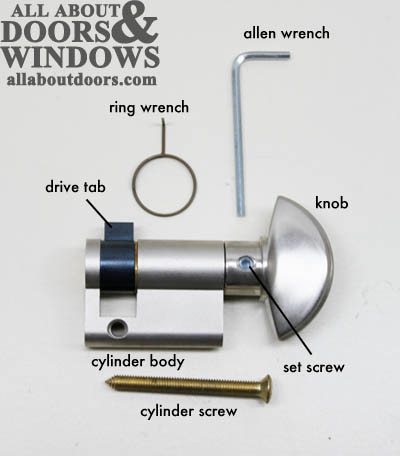
- 1) Loosen set screw on knob using the Allen wrench provided.
- 2) Remove the knob from the body of the cylinder.
- 3) Insert the key.
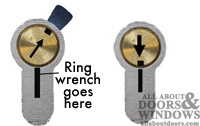
- 4) Push the pin down with the ring wrench included. Turn the cylinder shaft until the drive tab (the black piece jutting out) is pointing down.
- 5) Holding the key in this position, insert the cylinder body into the door from the outside in.
- 6) Engage the lock by turning the key.
- 7) Fix the knob horizontally on the cylinder shaft with the set screw downwards.
- 8) Tighten set screw. Install the cylinder screw.
Contact All About Doors & Windows with questions.
Key Cylinder Removal:
To start the key cylinder removal process, loosen and remove the cylinder screw and repeat steps 2-5 above. Remember: the key cylinder must be removed from the outside (you must pull it out by the keyed side, not the knob side).
Lock Rekeying Information to Know:
| Key blanks at the store | Schlage® (SC1) or Weiser® depending on original order |
| Key blanks from HOPPE: | Part Number SCH 50/27 |
| Mini rekeying kits rekey 10 cylinders: | Part Number SCHKK-5MINI |
| Large rekeying kits rekey 100 cylinders: | Part Number SCHKK-5 |
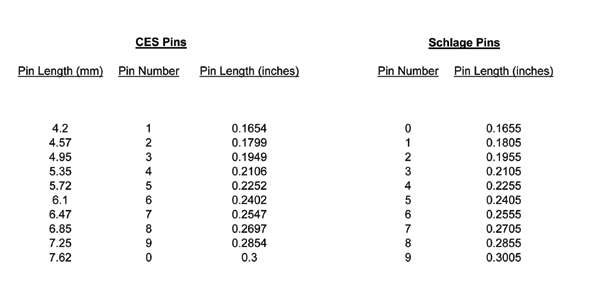
CES Pins vs. Schlage Pins Conversion Charts
It is possible to use either Schlage bottom (core) pins or CES bottom (core) pins when rekeying the Schlage “C” keyway cylinders, however the pin lengths vary slightly between sources. The conversion chart below lists the correlation between CES and Schlage pin numbers and sizes.